Set to lay Subham Cool Roof White Tiles
|
LAYING INSTRUCTION
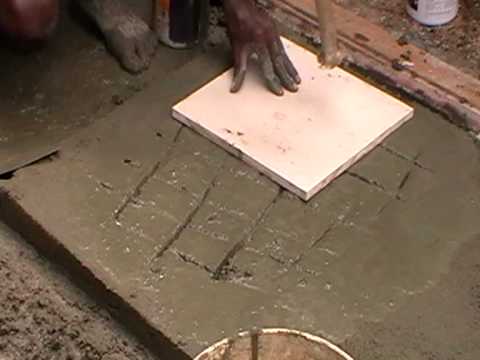
Step 1. Prepare your floor Before you start laying your tiles, make sure that your floor is clean and dry. The very first important step is to level the floor. Look for imperfections and gaps and fill them using a leveling floor compound. Determine the center point of the room with the help of a measuring tape and chalk. Run a trial installation and place the Subham Cool Roof White Tiles on the floor starting with the center point and then moving side-ward. This process shall assist you to identify sections where you need to install cut tiles and shall allow you to check the final pattern. Step 2. Measure and mark your datum line Use your spirit level, tape measure and pencil to mark out your datum line. This is your point of reference for laying the tiles, so that they are straight and symmetrical. In this instance, the datum line allows for a full tile either side of the line, and then for tiles that are the same width at the edges of the area being tiled. Step 3. Prepare the Laying floor Spread a thin-set mortar over a 3 x 3-foot section at the intersection of the layout lines. Working in small, square sections, - say 3 feet x 3 feet - is important. If you are working with a larger section, the mortar may harden (known as setting up) before you put the tiles in place. Be careful not to cover the layout lines & that is no less than 1 inch thick. A thinner sub floor will cause the floor to flex due to the weight of the tile.
Additional Concrete - Additional Concrete Chips Layering or Kappi Flooring your roof is Not Required for laying Subham Cool Roof White Tiles as the 20mm thick Double Layered Compressed Concrete Subham Cool Roof White Tiles has inbuilt concrete shield to secure your terrace from Heat, Water leakage & Vibration. Step 4. Begin Laying the Tiles Start laying Square Subham Cool Roof White Tiles at the center point of the two layout lines, setting each tile into the mortar by tapping it gently with a rubber mallet. Place the Square Subham Cool Roof White Tiles set in the right angles for the mortared area, place the subsequent tiles along the right angle lines, and place it on base mortar. Tap gently only with a rubber or wooden mallet to obtain perfect levels. Clean the surface of the tile with clean water immediately after laying with wet sponge, Ensure the base mortar cement that squeezes through the joints does not settle on the tile. Also, ensure that the water used is not hard to brackish Continue laying tiles until you have covered the mortared area and then continue (step 3) the process by applying mortar to another section and then laying tiles. Step 5. Fit the last tile in the row at the wall. This step usually requires that you measure and cut the tile. First, set a scrap tile against the wall — it allows space for grout. Next, place a loose tile directly over the last full tile you laid (this is the tile you will cut to size). Then place another tile on the loose one and up against the tile on the wall. Mark the loose tile and cut it to fit along the edge. Allow pointing material to set for 15 minutes and then clean the surface of the tile with a clean wet sponge, removing the excess pigment on the tile surface. Wash the surface with soap water or mild detergent to obtain a clean surface and wipe it Do not use the area laid for at least 24 hours. Step 6. Fix the Gaps & Edges After all the tiles are set in the mortar, mix the Special Subham Granule Mix (Provided along with your tiles purchase at no extra cost) & White Cement 1:1, prepare a semi solid paste, and insert it to the gaps of the Tiles array laid using a rubber grout float. Use a sweeping motion, pressing the grout into the gaps. Wipe away the excess grout with a grout sponge. Let the grout dry slightly and then wipe off the haze that appears. Allow pointing material to set for 15 minutes and then clean the surface of the tile with a clean wet sponge, removing the excess pigment on the tile surface. Wash the surface with soap water or mild detergent to obtain a clean surface and wipe it Step 7. Witness the Glazing White Subham Weatherproof, Leak-proof & Vibration-proof Terrace 
|


|


